
In this quick tutorial learn how to
apply a stylized urban look to your portrait photo’s.

The stock image I’ve used for this
tutorial can be downloaded here.

With your photo open in Photoshop, go
to the bottom of your layers panel and click on the adjustment layer button,
then choose Brightness/Contrast from the list.

This will have added a new adjustable
layer above your photo layer.

In the box that pops up, set the
Brightness to +25 and the Contrast to +35.

Next we’ll add another adjustment
layer, this time choose Hue/Saturation.

Set the Saturation to -25.

Now add a Curves adjustment layer.

First choose Red from the drop down
menu, then click on the centre of the red line and drag it down a little.

Then choose Blue, and move the blue
line upwards.

Then choose Green, and move the green
line up a little.

In the layers panel, change the Curve
layer’s blending mode to Soft Light.


Finally we’ll add two Solid Color
adjustment layers.

For the first one, use a pale yellow
colour or type in ‘fff83′.

Change it’s blending mode to Overlay,
and it’s Opacity to 35%.


For the second Solid Color layer, set
the colour to ‘f000ff’.
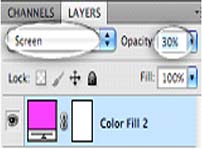
Set it’s blending mode to Screen, and
it’s Opacity to 30%.

Here’s how your final photo should
end up looking.

And your layers panel should end up
looking like the image above.
Below are a couple more example using
exactly the same steps.
Use the share buttons below if you
found this useful, and don’t forget to leave a


